Above the CP2000 offset control center light parameter setting
Polishing
1. Setting of the polishing unit
Varying pressure/compression of polishing blanket roller and measuring roller
First choice method
a. Press the Print function button on the menu bar (Fig. 7-46/1).
b. Press the Print Unit Group button (Fig. 7-46/2) on the print function menu to open the print function/preview menu.
c. Under the print function/preview menu, the following two methods can be used to separate/compress the measuring roller:
• Press the metering roller button (Fig. 7-46/4).
• Press the coater cylinder button (Fig. 7-46/3) to pressure/compress the coater cylinder and impression cylinder.
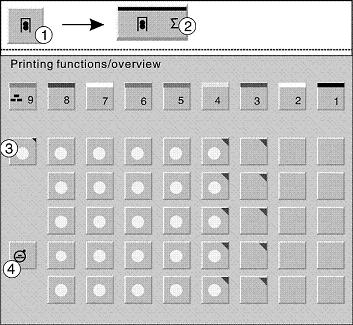
(Fig. 7-46 Setting of Coating Unit)
The second choice method
a. Press the Print function menu on the menu bar (Fig. 7-47/1).
b. Press the Clamping Unit button (Fig. 7-47/2) in the print function menu to open the Clamping Unit menu (Fig. 7-47).
c. In the coating unit menu, the following two methods are used to depressurize/compress the measuring roller:
• Press the metering roller button (Fig. 7-47/4) to depressurize/compress the metering roller.
· Roller pressure/compression. Press the polishing blanket cylinder pressure/compression button (Fig. 7-47/3), so that the polishing blanket cylinder and the impression cylinder pressure/compression, at this time, the measuring roller with pressure/compression
Glossy roller speed setting: The rotation of the gutter roller is driven by a separate motor. The operator can set the speed of the glazing roller under the Ink/Wetting Volume menu.
(Figure 7-47 Polishing Blanket Roller and Metering Roller Release/Combination Pressure Adjustment)
a. Press the Ink/Wetting Fluid button on the menu bar (Figure 7-48/1) to open the Ink, Wetting Fluid menu.
b. Use the +/- button (Fig. 7-48/2) of the glazing unit in the Ink/Wetting Volume menu to set the speed of the glazing roller: 0%: minimum speed, 100%: maximum speed.
(Fig. 7-48 Setting the speed of the glazing roller)
2. Polishing roller contact pressure with impression roller
For the printing unit, when the operator enters the paper thickness in the printing material menu, the contact pressure of the coating unit is automatically set.
To change the contact pressure of the glazing unit:
a. Press the Print function button on the menu bar (Fig. 7-49/1).
b. Under the print function menu, press the Clamp button (Fig. 7-49/2) to open the Clamp menu.
c. Use the +/- buttons (Fig. 7-49/3) to set the pressure between the blanket blanket cylinder and the impression cylinder. The set value is displayed on the side of the contact pressure symbol.
(Fig. 7-49 Polishing Unit Contact Pressure)
pop displays , http://www.chinadisplaystands.com